Guide to Getting Started with Shopify in Nigeria 2024
Shopify in Nigeria
Shopify is the fastest growing and most innovative eCommerce platform in the world. Now with over 1 million stores worldwide in 2024 you can be sure you're in good company when using Shopify. Think of Shopify as the BMW or Audi of eCommerce platforms, it's not cheap but it's reliable and powerful. While some will question the customisability of Shopify it truly has the majority of what you need to out of the box. Compared to open source platforms like Magento, WooCommerce and Prestashop you have the benefit of being supported by a platform that guarantees your site to work. Shopify has become popular enough in South Africa that there's plenty of agencies and freelancers to support. Local payment and shipping providers have also created enough integrations to ensure your well looked after. Today we're going to walk you through getting started with Shopify in South Africa.
Sign Up
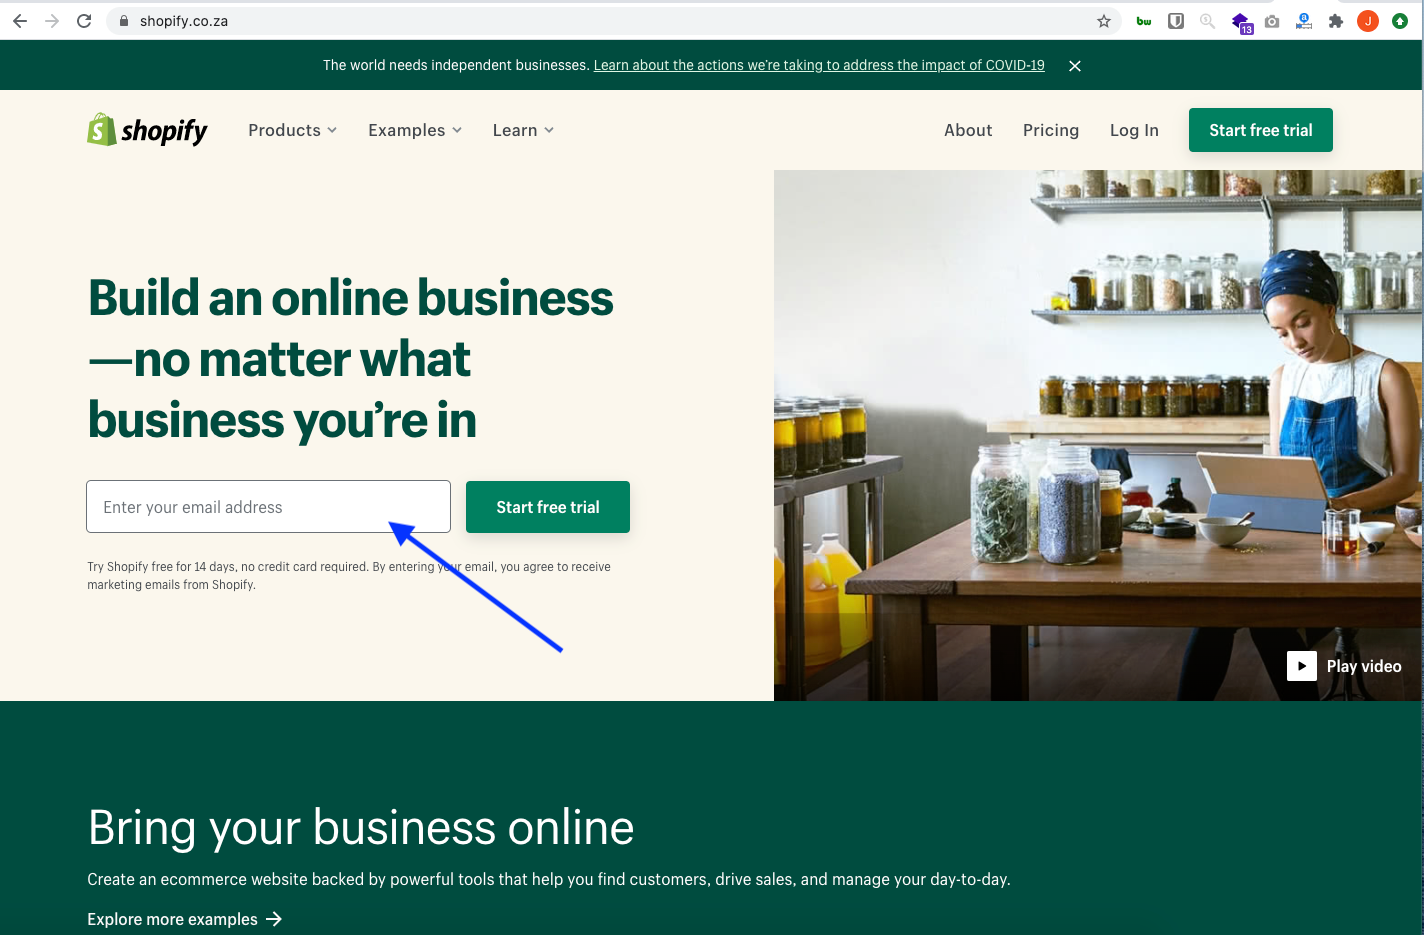
Shopify makes signing up easy and risk free. You can get started without committing to a subscription or entering any card details. To sign up simply click the button below and get started. Use our video walkthrough to see how easy signing up is.
Choosing a Plan
As mentioned Shopify offers a free trial for 14 days before you will need to pick a plan. If you are just starting it's likely the entry level Shopify Basic plan is going to be your best choice at $29 a month (R480). View the breakdown of the 3 plans you can choose from here. We've also created this handy calculator that helps you understand the long term costs of using Shopify and at which point it will make sense to switch to the $79 or $299 plan. The major considerations for moving to these plans are the lower payment fees that Shopify charges on top of the fees you will pay your payment provider.
Select a Theme
Think of themes as a style and template for your pages and products. Bundled into a theme are specific layouts for your homepage and other pages. Themes also often have functionality in them such as filters or search. Premium themes often bundle even more features in them that you might otherwise need to accomplish by buying apps eg: product reviews, enhanced filters, expandable menus. While choosing a theme is a big decision it's something you can always revisit later. Your products, pages, content and blogs will remain as is should you decide to switch themes at a later time.
Shopify offers a ton of high caliber themes for free, choosing what theme to use can be tricky when you are getting started. Some themes cater for specific types of businesses or businesses looking for specific features. To help you choose we'll share the most popular themes in South Africa below. You can also use our Store Navigator to see what other stores in South Africa are using.
Store Navigator was designed to help you see real life examples of themes you might consider using. When you head over to the Store Navigator filter as much as you like to narrow down your selection. Keep in mind that even if you choose the same theme as any store there's still ways to make your site look and feel very different from others. Everything from colours, fonts and layouts are easily changed from the editor (more on that later). Should you be feeling adventurous you can also make changes to the code of your site and theme. Shopify backups your code and settings so tinkering is fully reversible.
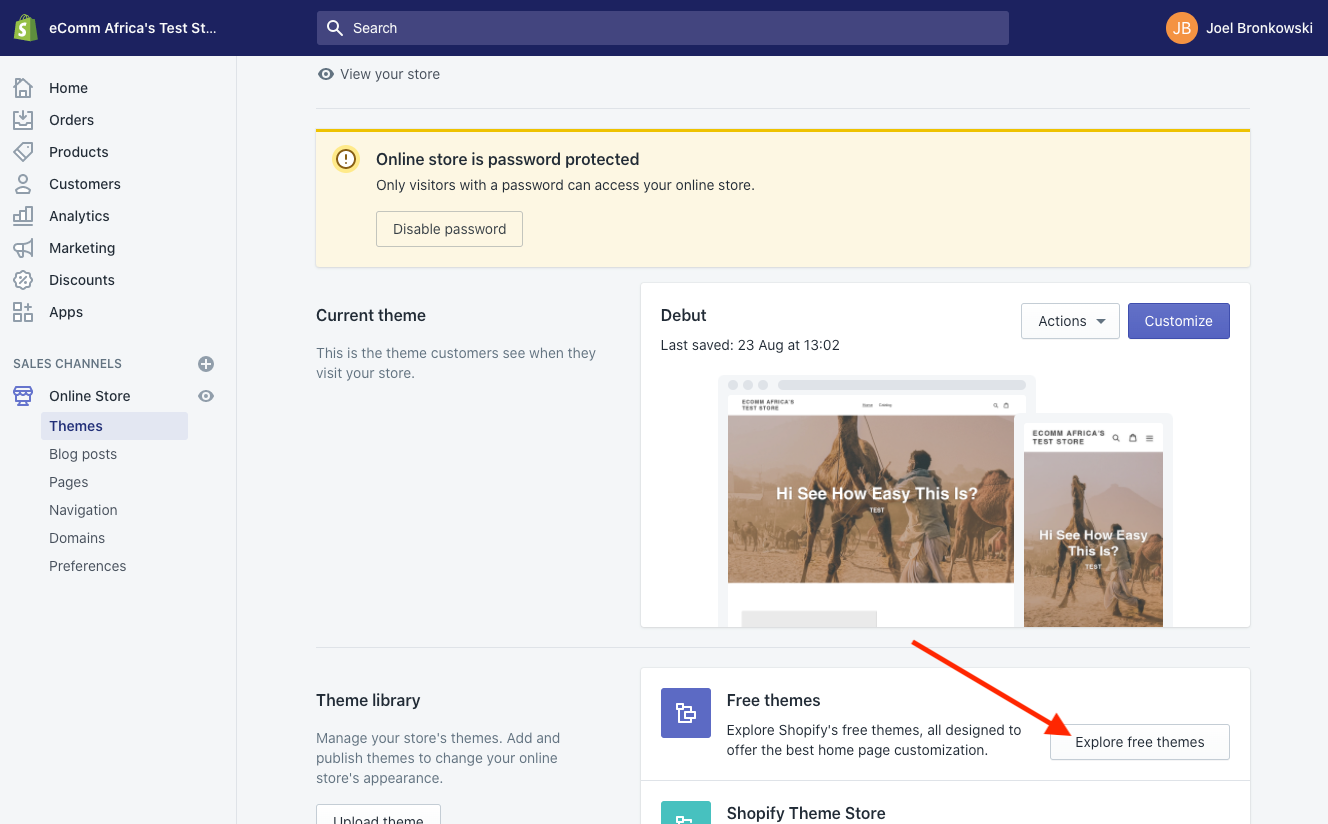
Debut will come pre-installed on your Shopify site. You can browse other free themes by selecting 'Explore Free Themes'. To try them out you can simply install them. To make changes to the theme you simply click on Customize under 'Current theme'.
Top Free Themes in South Africa
1. Debut
2. Supply
3. Venture
4. Brooklyn
5. Narrative
Top Paid Themes from Shopify in South Africa
1. Prestige
2. Testament
3. Pipeline
4. Empire
5. Blockshop
3. Edit Settings
While Shopify’s default settings cover a lot of bases there are some things to add and change to make the most of your shiny new store!
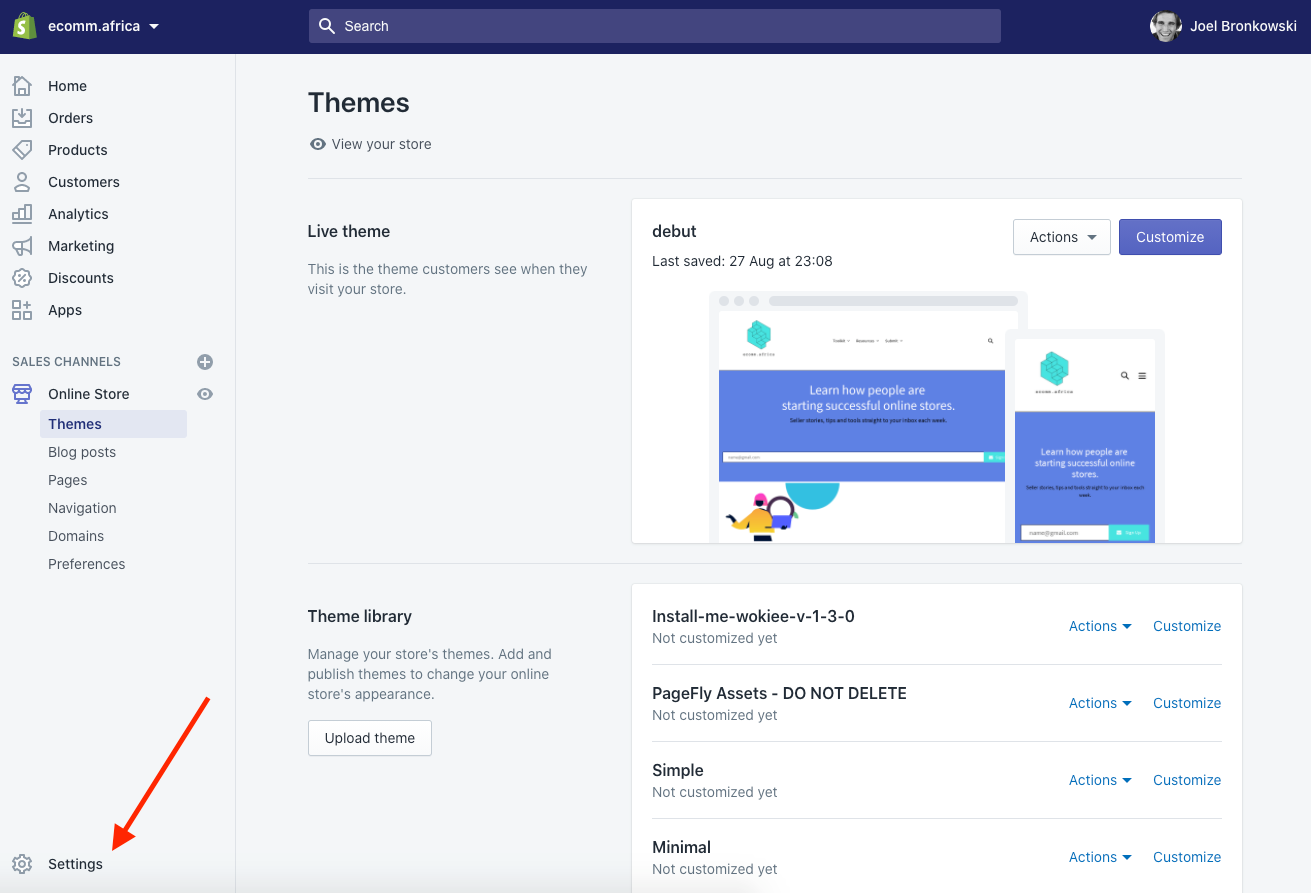
We'll take you through it step-by-step. Start by clicking the Settings button at the bottom left of your dashboard.
General Settings
Here you will edit your store name, email and store address. If you've changed your store since signing up, feel free to update it now.
The Account email is the email Shopify will send you notifications through. The Customer email is the one customers will email you through.
Enter the Legal name of your business if you have one, and edit your address if needed.
Next is the Standards and formats section, this is where you will set your timezone and information like weight units. The settings should be preset to the metric system, SAST and ZAR. With Shopify you can only have one currency per store so if you intend to sell in a currency other than ZAR this is where you'll change it. Make sure to click save after making changes to your settings.
Checkout Settings
Under checkout settings, switch Customer accounts to “optional,” and customers can create an account but aren’t required to unless you want to require customers to create accounts, generally this is not advised.
View the remaining settings on the page and ensure they’re set to your preferences. If you’ve set up Google Analytics or a Facebook pixel, add your custom conversion code in the Additional scripts box. When you’re done, click Save.
Shipping Settings
This section will require you to have made some decisions about how you are handling shipping.
1. Are you shipping in your province only, nationally in South Africa and Internationally. For each of those do you want to charge different prices or standardise pricing?
If you’re dropshipping: you can use “Price based rates.” Someone with a R150 order can pay one rate, and someone with a R300 order can pay a different shipping rate.
Tip: Regardless of how you ship, you can offer free shipping. You build shipping into your pricing and set rules for minimum order. This is likely to increase conversions and average order value.
For local delivery and local pickup add your address. Shopify has more recently enabled the ability for you to indicate which location your products are based. If you are just getting started this is likely not relevant but down the line who knows maybe you'll have products in different warehouses or locations.
Plans and Permissions Settings
Shopify allows you to enable different users with access to various functions within the platform. Depending on the plan you are on you will have access to various levels of staff accounts. To add a staff member click 'Add staff account'.
Legal Settings
Legal settings are not to be overlooked without setting this up correctly, you could be operating illegally.
Every online store needs a Refund Policy, a Privacy Policy, and a Terms of Service (ToS) Agreement.
Fortunately, Shopify can generate one for you based on your settings. Again, remember we are not lawyers and this is not legal advice. Once your store starts generating revenue, I recommend having an attorney review these documents for you.
Simply click the three Create from template buttons under each section.
Next, create pages for each document. Right-click Online Store and open it in a new tab (so it’s easy to copy and paste from the Legal settings page).
Title the first page “Refund Policy”. Go back to your legal settings tab and copy the entire refund policy, then paste it in the new Refund Policy page in the other tab. Click Save. Repeat for your “Privacy Policy” page and “Terms of Service” page.
Preferences
This is the only primary setting that you will not find under the “Settings” page; instead, go to Online Store > Preferences.
First, make sure you edit your store’s meta title and description this is the text that will appears in search engines.
Domains
All stores are automatically assigned a .myshopify domain. To setup a custom domain you can purchase a domain from any provider that allows you to make changes to the domain name server [DNS] settings. You can buy domains directly from Shopify or you can buy a local .co.za domain from GoDaddy for R80. Shopify makes it really easy to connect your GoDaddy domain to your Shopify store.
If you are torn between using a .com or .org domain vs a .co.za or .africa domain the simplest way to think about this is whether you have plans to focus on South Africa or an international audience. If you have international aspirations for your store then consider going with .com if your focused only on South Africa go with .co.za.
4. Payments
In South Africa you will need to choose between selling in ZAR or USD.
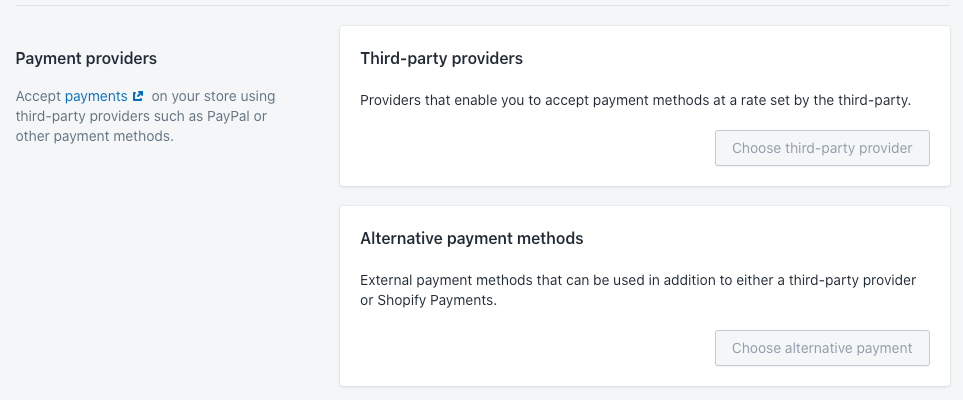
To select a payment provider go to settings >> select Payments. You'll be selecting from third-party payment providers. Here's your options in South Africa for primary payment providers.
We suggest Paystack for it's cost, ease of use, simple UX and because you can handle all your refunds directly from the Shopify dashboard.
Once you've setup your account with one of the providers above you'll copy your public and secret API keys from your payment provider and copy them into your payment settings in Shopify.
5. Adding Products
Time for the fun part, let's add products to your store. To get started click Products and Add Product.
Title and Description
Enter your product title and description.
Images
Make sure your images are high quality, bad images will lead to less sales.
Product type
This is the type of product or category you sell. Product types are one of the ways to create product collections, more on that later.
Vendors
If you have different people selling on your store or want to list seperate brands then consider using Vendors. Otherwise you can leave this blank.
Collections
These are groupings of products that enable you to display products together. You can create collections like Newly Added or Featured to easily create pages with products that you've added to a collection.
Tags
To organise and group products you can use as many tags as you like. These tags can then be used by your customers to find specific products.
Pricing
Your Price is the price customers will pay. Your Compare at price will be shown crossed out next to your actual price to use for price anchoring.
Inventory
Your inventory settings help with keeping track of inventory (shocking, I know!). You can create a custom SKU for your products if you want. Otherwise, you can leave these settings alone.
Variants
This is where you add variations of your products such as size or color. Eg if you’re selling clothes, you can add size (S, M, L) or color.
6. Creating Pages
You can create pages by selecting Online Store and then Pages. Here's a few pages you should consider creating:
A Contact Us page
An About Us page
A Shipping Policy page
Make sure to have a look at the pre-made templates in the drop-down menu under Templates to make this process easier.
7. Top Apps
Shopify has several thousand apps to choose from many of which are either free or have free trials. Keep an eye on our blog for more information on apps and services. Below are the most popular apps used by Shopify stores in South Africa.
8. Shipping
South Africa has come a very long way in terms of shipping costs and solutions for eCommerce retailers. We are not going to touch on couriers themselves in this post but below are apps that make it easier for you to create waybills and automate shipping in South Africa with multiple couriers.
Shopify is the fastest growing and most innovative eCommerce platform in the world. Now with over 1 million stores worldwide in 2022 you can be sure you're in good company when using Shopify. Think of Shopify as the BMW or Audi of eCommerce platforms, it's not cheap but it's reliable and powerful. While some will question the customisability of Shopify it truly has the majority of what you need to out of the box. Compared to open source platforms like Magento, WooCommerce and Prestashop you have the benefit of being supported by a platform that guarantees your site to work. Shopify has become popular enough in Nigeria that there's plenty of agencies and freelancers to support. Local payment and shipping providers have also created enough integrations to ensure your well looked after. Today we're going to walk you through getting started with Shopify in Nigeria.
Sign Up
Shopify makes signing up easy and risk free. You can get started without committing to a subscription or entering any card details. To sign up simply click the button below and get started. Use our video walkthrough to see how easy signing up is.
Choosing a Plan
As mentioned Shopify offers a free trial for 14 days before you will need to pick a plan. If you are just starting it's likely the entry level Shopify Basic plan is going to be your best choice at $29 a month (12,000 Naira). View the breakdown of the 3 plans you can choose from here. We've also created this handy calculator that helps you understand the long term costs of using Shopify and at which point it will make sense to switch to the $79 or $299 plan. The major considerations for moving to these plans are the lower payment fees that Shopify charges on top of the fees you will pay your payment provider.
Select a Theme
Think of themes as a style and template for your pages and products. Bundled into a theme are specific layouts for your homepage and other pages. Themes also often have functionality in them such as filters or search. Premium themes often bundle even more features in them that you might otherwise need to accomplish by buying apps eg: product reviews, enhanced filters, expandable menus. While choosing a theme is a big decision it's something you can always revisit later. Your products, pages, content and blogs will remain as is should you decide to switch themes at a later time.
Shopify offers a ton of high caliber themes for free, choosing what theme to use can be tricky when you are getting started. Some themes cater for specific types of businesses or businesses looking for specific features. To help you choose we'll share the most popular themes in Nigeria below. You can also use our Store Navigator to see what other stores in Nigeria are using.
Store Navigator was designed to help you see real life examples of themes you might consider using. When you head over to the Store Navigator filter as much as you like to narrow down your selection. Keep in mind that even if you choose the same theme as any store there's still ways to make your site look and feel very different from others. Everything from colours, fonts and layouts are easily changed from the editor (more on that later). Should you be feeling adventurous you can also make changes to the code of your site and theme. Shopify backups your code and settings so tinkering is fully reversible.
Debut will come pre-installed on your Shopify site. You can browse other free themes by selecting 'Explore Free Themes'. To try them out you can simply install them. To make changes to the theme you simply click on Customize under 'Current theme'.
Top Free Themes in Nigeria
1. Debut
2. Supply
3. Venture
4. Brooklyn
5. Narrative
Top Paid Themes from Shopify in Nigeria
1. Prestige
2. Testament
3. Pipeline
4. Empire
5. Blockshop
3. Edit Settings
While Shopify’s default settings cover a lot of bases there are some things to add and change to make the most of your shiny new store!
We'll take you through it step-by-step. Start by clicking the Settings button at the bottom left of your dashboard.
General Settings
Here you will edit your store name, email and store address. If you've changed your store since signing up, feel free to update it now.
The Account email is the email Shopify will send you notifications through. The Customer email is the one customers will email you through.
Enter the Legal name of your business if you have one, and edit your address if needed.
Next is the Standards and formats section, this is where you will set your timezone and information like weight units. The settings should be preset to the metric system, SAST and ZAR. With Shopify you can only have one currency per store so if you intend to sell in a currency other than ZAR this is where you'll change it. Make sure to click save after making changes to your settings.
Checkout Settings
Under checkout settings, switch Customer accounts to “optional,” and customers can create an account but aren’t required to unless you want to require customers to create accounts, generally this is not advised.
View the remaining settings on the page and ensure they’re set to your preferences. If you’ve set up Google Analytics or a Facebook pixel, add your custom conversion code in the Additional scripts box. When you’re done, click Save.
Shipping Settings
This section will require you to have made some decisions about how you are handling shipping.
1. Are you shipping in your state, nationally in Nigeria and Internationally. For each of those do you want to charge different prices or standardise pricing?
If you’re dropshipping: you can use “Price based rates.” Someone with a 1000 Naira order can pay one rate, and someone with a 3000 Naira order can pay a different shipping rate.
Tip: Regardless of how you ship, you can offer free shipping. You build shipping into your pricing and set rules for minimum order. This is likely to increase conversions and average order value.
For local delivery and local pickup add your address. Shopify has more recently enabled the ability for you to indicate which location your products are based. If you are just getting started this is likely not relevant but down the line who knows maybe you'll have products in different warehouses or locations.
Plans and Permissions Settings
Shopify allows you to enable different users with access to various functions within the platform. Depending on the plan you are on you will have access to various levels of staff accounts. To add a staff member click 'Add staff account'.
Legal Settings
Legal settings are not to be overlooked without setting this up correctly, you could be operating illegally.
Every online store needs a Refund Policy, a Privacy Policy, and a Terms of Service (ToS) Agreement.
Fortunately, Shopify can generate one for you based on your settings. Again, remember we are not lawyers and this is not legal advice. Once your store starts generating revenue, I recommend having an attorney review these documents for you.
Simply click the three Create from template buttons under each section.
Next, create pages for each document. Right-click Online Store and open it in a new tab (so it’s easy to copy and paste from the Legal settings page).
Title the first page “Refund Policy”. Go back to your legal settings tab and copy the entire refund policy, then paste it in the new Refund Policy page in the other tab. Click Save. Repeat for your “Privacy Policy” page and “Terms of Service” page.
Preferences
This is the only primary setting that you will not find under the “Settings” page; instead, go to Online Store > Preferences.
First, make sure you edit your store’s meta title and description this is the text that will appears in search engines.
Domains
All stores are automatically assigned a .myshopify domain. To setup a custom domain you can purchase a domain from any provider that allows you to make changes to the domain name server [DNS] settings. You can buy domains directly from Shopify or you can buy a local .co.za domain from GoDaddy for R80. Shopify makes it really easy to connect your GoDaddy domain to your Shopify store.
If you are torn between using a .com or .org domain vs a .co.za or .africa domain the simplest way to think about this is whether you have plans to focus on Nigeria or an international audience. If you have international aspirations for your store then consider going with .com if your focused only on Nigeria go with .ng.
4. Payments
In Nigeria you will need to choose between selling in NGN or USD.
To select a payment provider go to settings >> select Payments. You'll be selecting from third-party payment providers. Here's your options in Nigeria for primary payment providers.
We suggest Paystack for it's cost, ease of use, simple UX and because you can handle all your refunds directly from the Shopify dashboard.

Once you've setup your account with one of the providers above you'll copy your public and secret API keys from your payment provider and copy them into your payment settings in Shopify.
5. Adding Products
Time for the fun part, let's add products to your store. To get started click Products and Add Product.
Title and Description
Enter your product title and description.
Images
Make sure your images are high quality, bad images will lead to less sales.
Product type
This is the type of product or category you sell. Product types are one of the ways to create product collections, more on that later.
Vendors
If you have different people selling on your store or want to list seperate brands then consider using Vendors. Otherwise you can leave this blank.
Collections
These are groupings of products that enable you to display products together. You can create collections like Newly Added or Featured to easily create pages with products that you've added to a collection.
Tags
To organise and group products you can use as many tags as you like. These tags can then be used by your customers to find specific products.
Pricing
Your Price is the price customers will pay. Your Compare at price will be shown crossed out next to your actual price to use for price anchoring.
Inventory
Your inventory settings help with keeping track of inventory (shocking, I know!). You can create a custom SKU for your products if you want. Otherwise, you can leave these settings alone.
Variants
This is where you add variations of your products such as size or colour. Eg if you’re selling clothes, you can add size (S, M, L) or colour.
6. Creating Pages
You can create pages by selecting Online Store and then Pages. Here's a few pages you should consider creating:
A Contact Us page
An About Us page
A Shipping Policy page
Make sure to have a look at the pre-made templates in the drop-down menu under Templates to make this process easier.
7. Top Apps
Shopify has several thousand apps to choose from many of which are either free or have free trials. Keep an eye on our blog for more information on apps and services. Below are the most popular apps used by Shopify stores in Nigeria.

8. Shipping
Nigeria has come a very long way in terms of hyperlocal logistics and affordable shipping in Lagos and to an international audience. Kwik Delivery is the only courier that's created a Shopify app to enable shipping.